
Deep learning has revolutionized the field of artificial intelligence (AI) by enabling machines to learn and generate content that mimics human-like creativity. One advancement in this domain is Stable Diffusion, a text-to-image model released in 2022.
Stable Diffusion has gained significant attention for its ability to generate highly detailed images conditioned on text descriptions, thereby opening up new possibilities in areas such as creative design, visual storytelling, and content generation. With its open source nature and accessibility, Stable Diffusion has become a go-to tool for many researchers and developers seeking to harness the power of deep learning.
In this article, we will explore how to optimize deep learning workflows by leveraging Stable Diffusion alongside Docker on WSL 2, enabling seamless and efficient experimentation with this cutting-edge technology.

In this comprehensive guide, we will walk through the process of setting up the Stable Diffusion WebUI Docker, which includes enabling WSL 2 and installing Docker Desktop. You will learn how to download the required code from GitHub and initialize it using Docker Compose.
The guide provides instructions on adding additional models and managing the system, covering essential tasks such as reloading the UI and determining the ideal location for saving image output. Troubleshooting steps and tips for monitoring hardware and GPU usage are also included, ensuring a smooth and efficient experience with Stable Diffusion WebUI (Figure 1).
Why use Docker Desktop for Stable Diffusion?
In the realm of image-based generative AI, setting up an effective execution and development environment on a Windows PC can present particular challenges. These challenges arise due to differences in software dependencies, compatibility issues, and the need for specialized tools and frameworks. Docker Desktop emerges as a powerful solution to tackle these challenges by providing a containerization platform that ensures consistency and reproducibility across different systems.
By leveraging Docker Desktop, we can create an isolated environment that encapsulates all the necessary components and dependencies required for image-based generative AI workflows. This approach eliminates the complexities associated with manual software installations, conflicting library versions, and system-specific configurations.
Using Stable Diffusion WebUI
The Stable Diffusion WebUI is a browser interface that is built upon the Gradio library, offering a convenient way to interact with and explore the capabilities of Stable Diffusion. Gradio is a powerful Python library that simplifies the process of creating interactive interfaces for machine learning models.
Setting up the Stable Diffusion WebUI environment can be a tedious and time-consuming process, requiring multiple steps for environment construction. However, a convenient solution is available in the form of Stable Diffusion WebUI Docker project. This Docker image eliminates the need for manual setup by providing a preconfigured environment.
If you’re using Windows and have Docker Desktop installed, you can effortlessly build and run the environment using the docker-compose command. You don’t have to worry about preparing libraries or dependencies beforehand because everything is encapsulated within the container.
You might wonder whether there are any problems because it’s a container. I was anxious before I started using it, but I haven’t had any particular problems so far. The images, models, variational autoencoders (VAEs), and other data that are generated are shared (bind mounted) with my Windows machine, so I can exchange files simply by dragging them in Explorer or in the Files of the target container on Docker Desktop.
The most trouble I had was when I disabled the extension without backing it up, and in a moment blew away about 50GB of data that I had spent half a day training. (This is a joke!)
Architecture
I’ve compiled a relatively simple procedure to start with Stable Diffusion using Docker Desktop on Windows.
Prerequisites:
- Windows 10 Pro, 21H2 Build 19044.2846
- 16GB RAM
- NVIDIA GeForce RTX 2060 SUPER
- WSL 2 (Ubuntu)
- Docker Desktop 4.18.0 (104112)
Setup with Docker Compose
We will use the WebUI called AUTOMATIC1111 to utilize Stable Diffusion this time. The environment for these will be constructed using Docker Compose. The main components are shown in Figure 2.
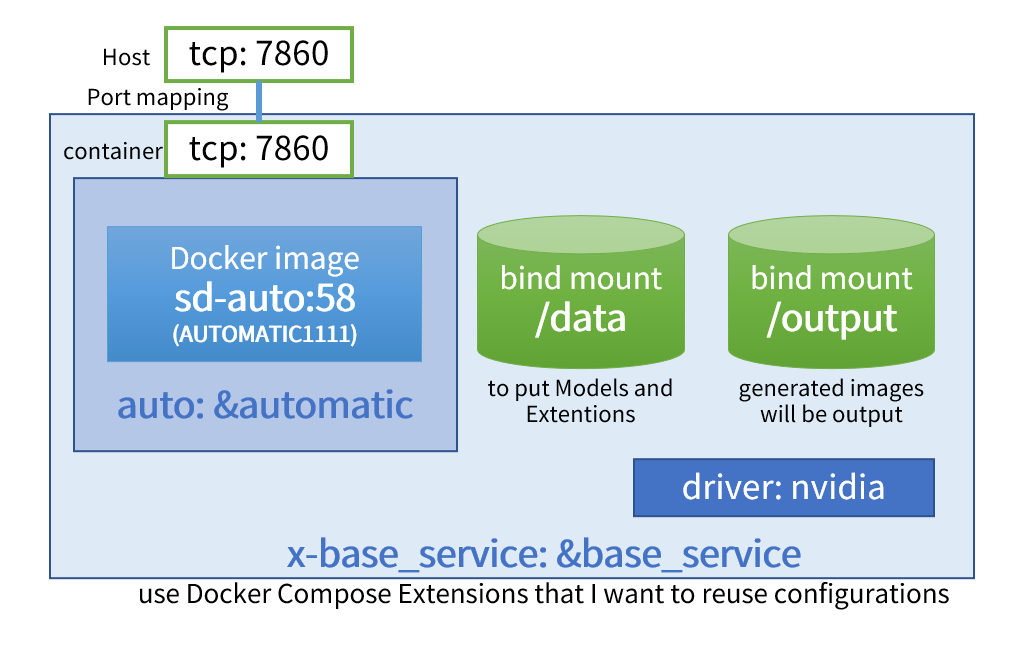
The configuration of Docker Compose is defined in docker-compose.yml. We are using a Compose extension called x-base_service to describe the major components common to each service.
To start, there are settings for bind mount between the host and the container, including /data, which loads modes, and /output, which outputs images. Then, we make the container recognize the GPU by loading the NVIDIA driver.
Furthermore, the service named sd-auto:58 runs AUTOMATIC1111, WebUI for Stable Diffusion, within the container. Because there is a port mapping (TCP:7860), between the host and the container in the aforementioned common service settings, it is possible to access from the browser on the host side to the inside of the container.
Getting Started
Prerequisite
WSL 2 must be activated and Docker Desktop installed.
On the first execution, it downloads 12GB of Stable Diffusion 1.5 models, etc. The Web UI cannot be used until this download is complete. Depending on your connection, it may take a long time until the first startup.
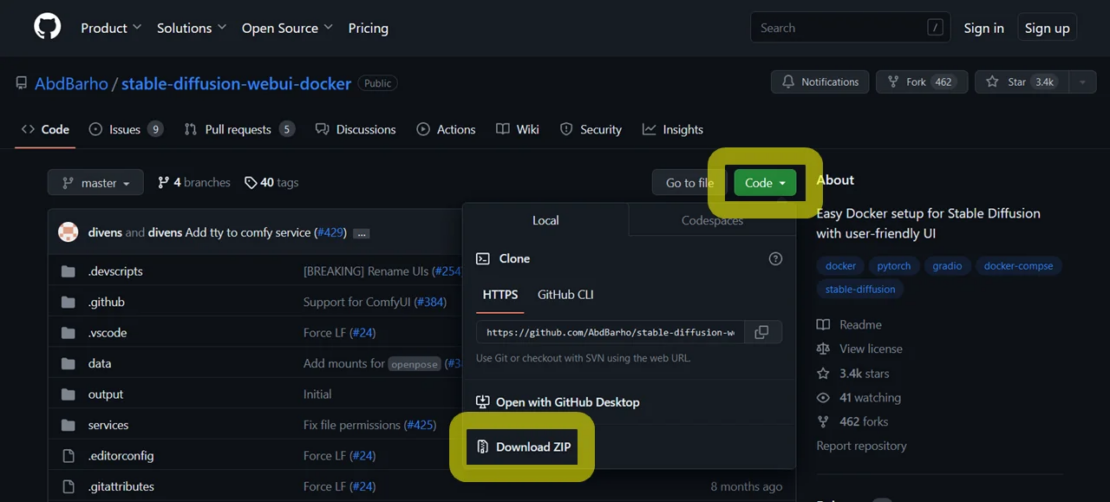
Downloading the code
First, download the Stable Diffusion WebUI Docker code from GitHub. If you download it as a ZIP, click Code > Download ZIP and the stable-diffusion-webui-docker-master.zip file will be downloaded (Figure 3).
Unzip the file in a convenient location. When you expand it, you will find a folder named stable-diffusion-webui-docker-master. Open the command line or similar and run the docker compose command inside it.
Or, if you have an environment where you can use Git, such as Git for Windows, it’s quicker to download it as follows:
git clone https://github.com/AbdBarho/stable-diffusion-webui-docker.git
In this case, the folder name is stable-diffusion-webui-docker. Move it with cd stable-diffusion-webui-docker.
Supplementary information for those familiar with Docker
If you just want to get started, you can skip this section.
By default, the timezone is UTC. To adjust the time displayed in the log and the date of the directory generated under output/txt2img to Japan time, add TZ=Asia/Tokyo to the environment variables of the auto service. Specifically, add the following description to environment:.
auto: &automatic
    <<: *base_service
    profiles: ["auto"]
    build: ./services/AUTOMATIC1111
    image: sd-auto:51
    environment:
      - CLI_ARGS=--allow-code --medvram --xformers --enable-insecure-extension-access --api
      - TZ=Asia/Tokyo
Tasks at first startup
The rest of the process is as described in the GitHub documentation. Inside the folder where the code is expanded, run the following command:
docker compose --profile download up --build
After the command runs, the log of a container named webui-docker-download-1 will be displayed on the screen. For a while, the download will run as follows, so wait until it is complete:
webui-docker-download-1 | [DL:256KiB][#4561e1 1.4GiB/3.9GiB(36%)][#42c377 1.4GiB/3.9GiB(37%)]
If the process ends successfully, it will be displayed as exited with code 0 and returned to the original prompt:
…(snip)
webui-docker-download-1  | https://github.com/xinntao/Real-ESRGAN/blob/master/LICENSE
webui-docker-download-1  | https://github.com/xinntao/ESRGAN/blob/master/LICENSE
webui-docker-download-1  | https://github.com/cszn/SCUNet/blob/main/LICENSE
webui-docker-download-1 exited with code 0
If a code other than 0 comes out like the following, the download process has failed:
webui-docker-download-1  | 42c377|OK  |   426KiB/s|/data/StableDiffusion/sd-v1-5-inpainting.ckpt
webui-docker-download-1  |
webui-docker-download-1  | Status Legend:
webui-docker-download-1  | (OK):download completed.(ERR):error occurred.
webui-docker-download-1  |
webui-docker-download-1  | aria2 will resume download if the transfer is restarted.
webui-docker-download-1  | If there are any errors, then see the log file. See '-l' option in help/m
an page for details.
webui-docker-download-1 exited with code 24
In this case, run the command again and check whether it ends successfully. Once it finishes successfully, run the command to start the WebUI.
Note: The following is for AUTOMATIC1111’s UI and GPU specification:
docker compose --profile auto up --build
When you run the command, loading the model at the first startup may take a few minutes. It may look like it’s frozen like the following display, but that’s okay:
webui-docker-auto-1  | LatentDiffusion: Running in eps-prediction mode
webui-docker-auto-1  | DiffusionWrapper has 859.52 M params.
If you wait for a while, the log will flow, and the following URL will be displayed:
webui-docker-auto-1 | Running on local URL: http://0.0.0.0:7860
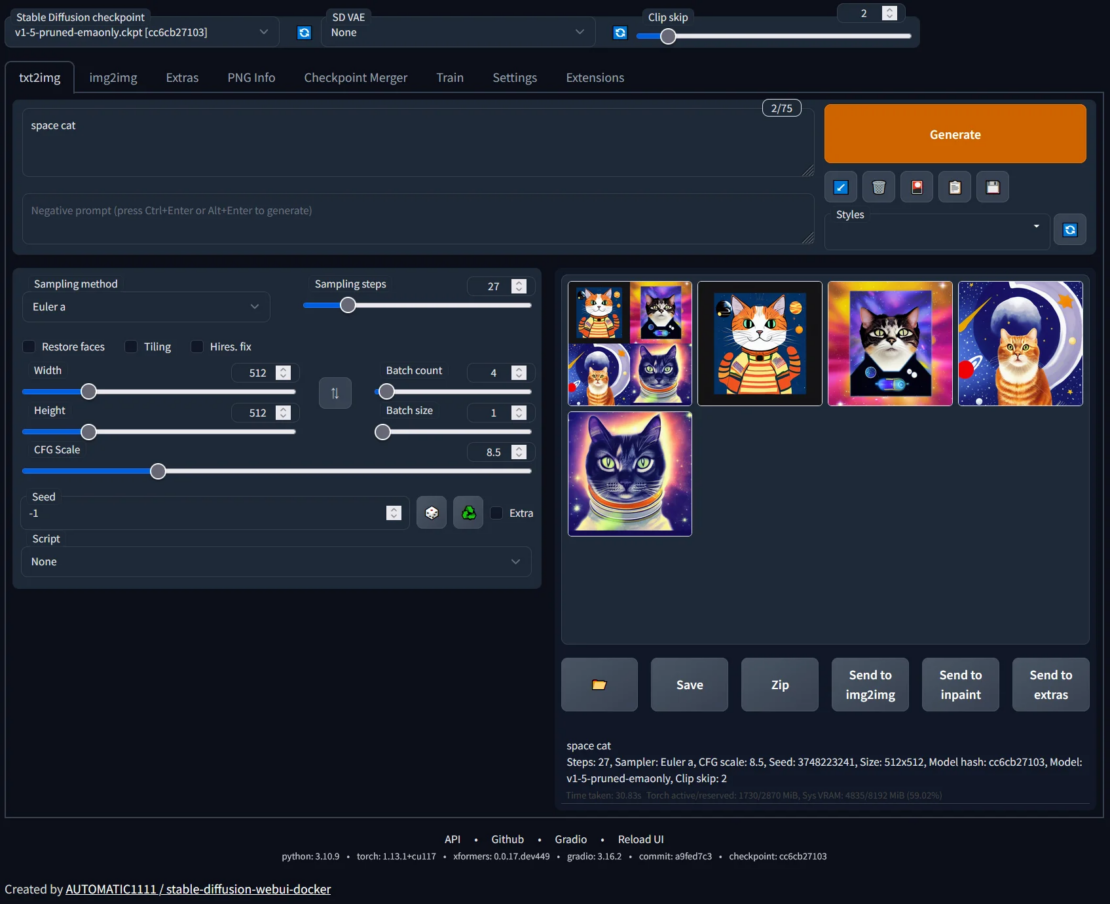
Now the startup preparation of the Web UI is set. If you open http://127.0.0.1:7860 from the browser, you can see the Web UI. Once open, select an appropriate model from the top left of the screen, write some text in the text field, and select the Generate button to start generating images (Figure 4).
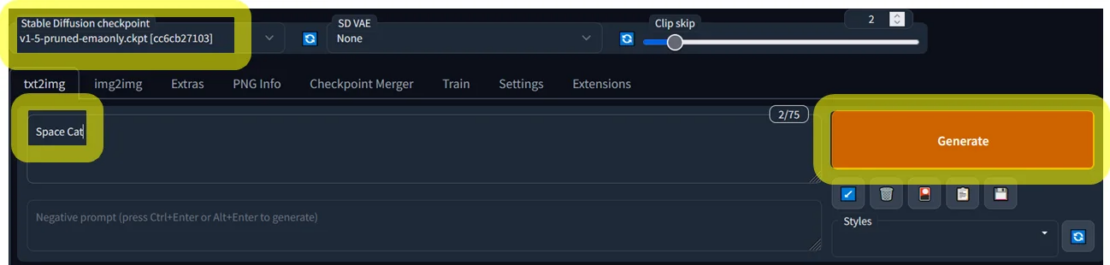
When you click, the button will be reversed. Wait until the process is finished (Figure 5).

At this time, the log of image generation appears on the terminal you are operating, and you can also check the similar display by looking at the log of the container on Docker Desktop (Figure 6).

When the status reaches 100%, the generation of the image is finished, and you can check it on the screen (Figure 7).
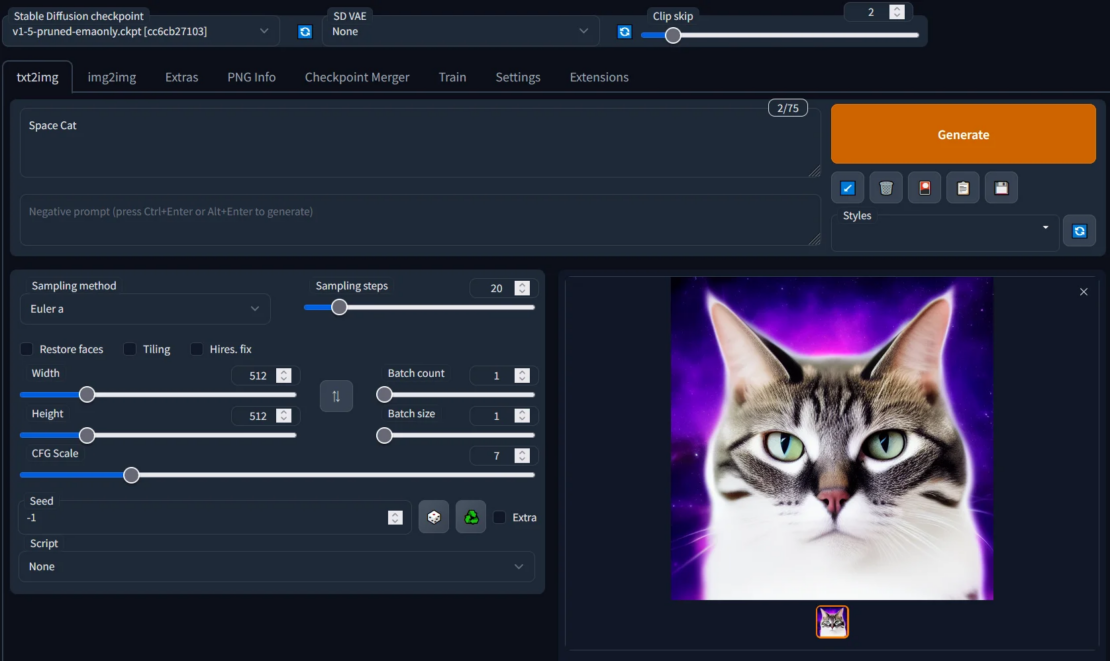
The created images are automatically saved in the output/txt2img/date folder directly under the directory where you ran the docker compose command.
To stop the launched WebUI, enter Ctrl+C on the terminal that is still running the docker compose command.
Gracefully stopping... (press Ctrl+C again to force)
Aborting on container exit...
[+] Running 1/1
 ? Container webui-docker-auto-1  Stopped                                                     11.4s
canceled
When the process ends successfully, you will be able to run the command again. To use the WebUI again after restarting, re-run the docker compose command:
docker compose --profile auto up --build
To see the operating hardware status, use the task manager to look at the GPU status (Figure 8).
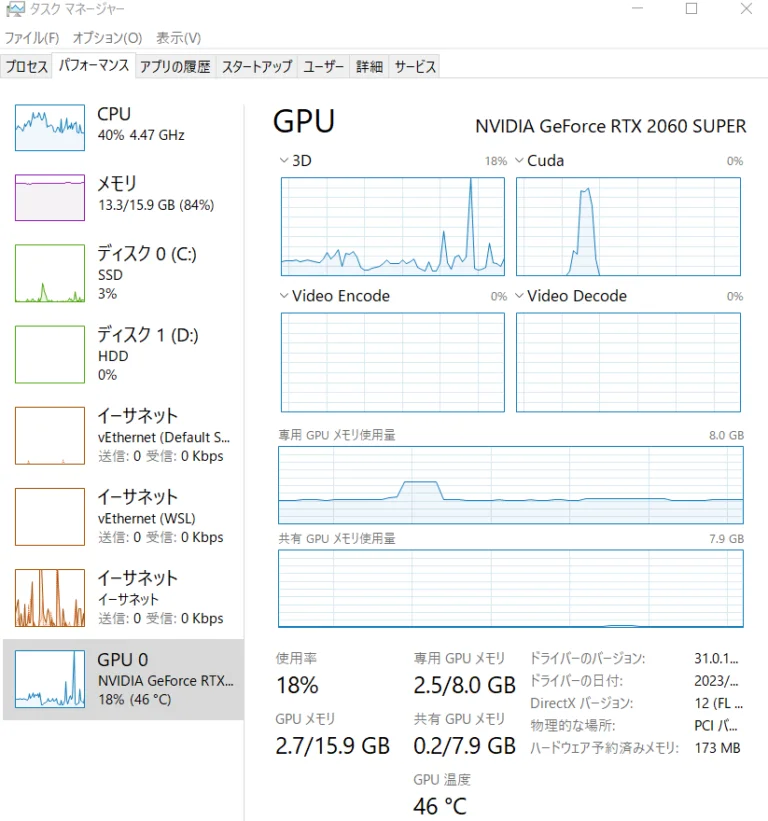
To check whether the GPU is visible from inside the container and to see whether the information comes out, run the nvidia-smi command from docker exec or the Docker Desktop terminal.
[email protected]:/stable-diffusion-webui# nvidia-smi
Mon Apr 17 07:42:27 2023
+---------------------------------------------------------------------------------------+
| NVIDIA-SMI 530.41.03              Driver Version: 531.41       CUDA Version: 12.1     |
|-----------------------------------------+----------------------+----------------------+
| GPU  Name                  Persistence-M| Bus-Id        Disp.A | Volatile Uncorr. ECC |
| Fan  Temp  Perf            Pwr:Usage/Cap|         Memory-Usage | GPU-Util  Compute M. |
|                                         |                      |               MIG M. |
|=========================================+======================+======================|
|   0  NVIDIA GeForce RTX 2060 S...    On | 00000000:01:00.0  On |                  N/A |
| 42%   40C    P8                6W / 175W|   2558MiB /  8192MiB |      2%      Default |
|                                         |                      |                  N/A |
+-----------------------------------------+----------------------+----------------------+
+---------------------------------------------------------------------------------------+
| Processes:                                                                            |
|  GPU   GI   CI        PID   Type   Process name                            GPU Memory |
|        ID   ID                                                             Usage      |
|=======================================================================================|
|    0   N/A  N/A       149      C   /python3.10                               N/A      |
+---------------------------------------------------------------------------------------+
Adding models and VAEs
If you download a model that is not included from the beginning, place files with extensions, such as .safetensors in stable-diffusion-webui-docker\data\StableDiffusion. In the case of VAE, place .skpt files in stable-diffusion-webui-docker\data\VAE.
If you’re using Docker Desktop, you can view and operate inside on the Files of the webui-docker-auto-1 container, so you can also drag it into Docker Desktop.
Figure 9 shows the Docker Desktop screen. It says MOUNT in the Note column, and it shares the information in the folder with the container from the Windows host side.

Now, after placing the file, a link to Reload UI is shown in the footer of the WebUI, so select there (Figure 10).

When you select Reload UI, the system will show a loading screen, and the browser connection will be cut off. When you reload the browser, the model and VAE files are automatically loaded. To remove a model, delete the model file from data\StableDiffusion.
Conclusion
With Docker Desktop, image generation using the latest generative AI environment can be done easier than ever. Typically, a lot of time and effort is required just to set up the environment, but Docker Desktop solves this complexity. If you’re interested, why not take a challenge in the world of generative AI? Enjoy!
Learn more
- Get the latest release of Docker Desktop.
- Have questions? The Docker community is here to help.
- New to Docker? Get started.
Feedback
0 thoughts on "Optimizing Deep Learning Workflows: Leveraging Stable Diffusion and Docker on WSL 2"